
Decluttering and organizing files is a task that many of us often delay. Over time, folders, especially the “Downloads” folder, become a chaotic mess. What if there was a way to keep it organized without lifting a finger? Enter Python.
In this tutorial, we’ll craft a Python script to automatically organize files in a directory based on their extensions.
Prerequisites:
- Basic understanding of how to run Python scripts
- Python installed on your machine
Setting Things Up:
Before diving into the script, it’s essential to understand the libraries we’ll be using:
- os: This built-in Python library lets us interact with the operating system, enabling actions like listing and renaming files.
- shutil: This library provides a higher-level file operation interface. We’ll use it to move files.
Crafting the File Organizer:
Step 1: Import necessary libraries.
import os

import shutil
`import`: This keyword is used to include a library in our script.
Step 2: Define our organization function.
def organize_files(directory):
`def`: This keyword lets us define a function. Here, we’re defining a function named `organize_files` that takes a directory path as its argument.
Step 3: Loop through each file in the specified directory.
for filename in os.listdir(directory):
os.listdir(directory): This fetches a list of all files and folders in the specified directory.
Step 4: Set conditions to move files based on their extensions.
Before we start moving files, we want to ensure the destination folders (like “PDFs” or “Images”) exist. If not, we’ll create them. This is essential to avoid inadvertently renaming files.
# For PDFs

        if filename.endswith('.pdf'):

            target_dir = os.path.join(directory, 'PDFs')

            # Check if the directory exists; if not, create it

            if not os.path.exists(target_dir):

                os.makedirs(target_dir)

            # Move the file

            shutil.move(os.path.join(directory, filename), target_dir)
filename.endswith('.pdf'): This checks if the current file ends with “.pdf”.os.path.join(directory, 'PDFs'): This joins the base directory with the sub-directory “PDFs”, creating a full path to where we want to move our PDFs.os.path.exists(target_dir): This checks if the target directory already exists.os.makedirs(target_dir): If the target directory doesn’t exist, this creates it.shutil.move(): This function moves the file to the specified directory.
Step 5: Specify the directory and run the function.
directory = '/path_to_your_directory'  # Replace with your directory path

organize_files(directory)
Replace ‘/path_to_your_directory‘ with the directory you want to organize, like ‘C:/Users/YourName/Downloads’.
Using the Automation Script:
- Save the above code in a file named organize_files.py.
- Navigate to the directory containing the script using your terminal or command prompt.
- Run the script:
python organize_files.py
Watch as files in the specified directory get organized into respective folders!
Complete script:
import os

import shutil

def organize_files(directory):

    """

    Organize files in the specified directory based on their extensions.

    """

    # Loop through each file in the directory

    for filename in os.listdir(directory):

        # Check if the file is a PDF

        if filename.endswith('.pdf'):

            target_dir = os.path.join(directory, 'PDFs')

            # Check if the directory exists; if not, create it

            if not os.path.exists(target_dir):

                os.makedirs(target_dir)

            # Move the file

            shutil.move(os.path.join(directory, filename), target_dir)

        # Check if the file is an image (either JPG or PNG)

        elif filename.endswith('.jpg') or filename.endswith('.png'):

            target_dir = os.path.join(directory, 'Images')

            # Check if the directory exists; if not, create it

            if not os.path.exists(target_dir):

                os.makedirs(target_dir)

            # Move the file

            shutil.move(os.path.join(directory, filename), target_dir)

        # Add more conditions based on other file types if needed

        print(f"Moved {filename} to {target_dir}")

# Specify the directory you want to organize

directory = '/path_to_your_directory'  # Replace this with the path to your directory

# Call the function to organize files

organize_files(directory)
For everyday users:
- Simply change the directory variable in the script to the folder you want to organize.
- Run the script whenever you feel your folder is getting cluttered.
Make automation script more versatile
With the above implementation of this automation script, you need to edit the code any time you want to use the script for a different folder or directory.
What if there was a way that could allow you to use the same code for any folder at all without the need to open the python code. Fortunately for us, there is an easy way. Python offers what we call “command line arguments”.
With command line arguments, we could make our script versatile such that we will provide the directory path when we are executing the file and not necessarily open the Python script to edit it.
We will need to import one more module that allows us to make use of command line arguments. Let us therefore take a look at that approach.
To achieve this, we’ll use the sys module, which provides access to Python interpreter variables and functions that interact with the interpreter.
Here’s the updated code:
import os

import shutil

import sys

def organize_files(directory):

    """

    Organize files in the specified directory based on their extensions.

    """

    # Loop through each file in the directory

    for filename in os.listdir(directory):

        # Check if the file is a PDF

        if filename.endswith('.pdf'):

            target_dir = os.path.join(directory, 'PDFs')

            # Check if the directory exists; if not, create it

            if not os.path.exists(target_dir):

                os.makedirs(target_dir)

            # Move the file

            shutil.move(os.path.join(directory, filename), target_dir)

        # Check if the file is an image (either JPG or PNG)

        elif filename.endswith('.jpg') or filename.endswith('.png'):

            target_dir = os.path.join(directory, 'Images')

            # Check if the directory exists; if not, create it

            if not os.path.exists(target_dir):

                os.makedirs(target_dir)

            # Move the file

            shutil.move(os.path.join(directory, filename), target_dir)

        # Add more conditions based on other file types if needed

        print(f"Moved {filename} to {target_dir}")

if __name__ == "__main__":

    # Check if a directory was passed as a command line argument

    if len(sys.argv) > 1:

        directory = sys.argv[1]  # Get the directory from the command line

        organize_files(directory)

    else:

        print("Please provide a directory path as a command line argument.")
To use this script:
- Save the script as organize_files.py.
- Run the script using the command python organize_files.py /path_to_your_directory. Replace /path_to_your_directory with the full path of the directory you want to organize.
If the user forgets to provide a directory, the script will remind them with the message: “Please provide a directory path as a command line argument.“

Here are examples for different operating systems:
1. Windows:
If a user wants to organize their `Downloads` folder and their username is `learninbits`, the command would look like:
python organize_files.py C:\Users\learninbits\Downloads
2. macOS and Linux:
If a user wants to organize their `Downloads` directory, the command would be:
python organize_files.py /Users/learninbits/Downloads
(Replace `learninbits` with the appropriate username.)
Remember to adjust the path according to your specific directory and system structure.
Practical use of the file organizing automation script
Let’s use the script above to organize a directory on my computer. The picture below shows the learninbits directory on my computer where we have a couple of images scattered in there. I would love to organize this directory to have all those images in an images folder.
So, let’s do that with the script we wrote earlier.
The path for the directory is “C:\Users\ehone\Downloads\learninBits”

To execute the file, I use the command in the screenshot below:


After running the command, you see that the output shows the files that have been moved.

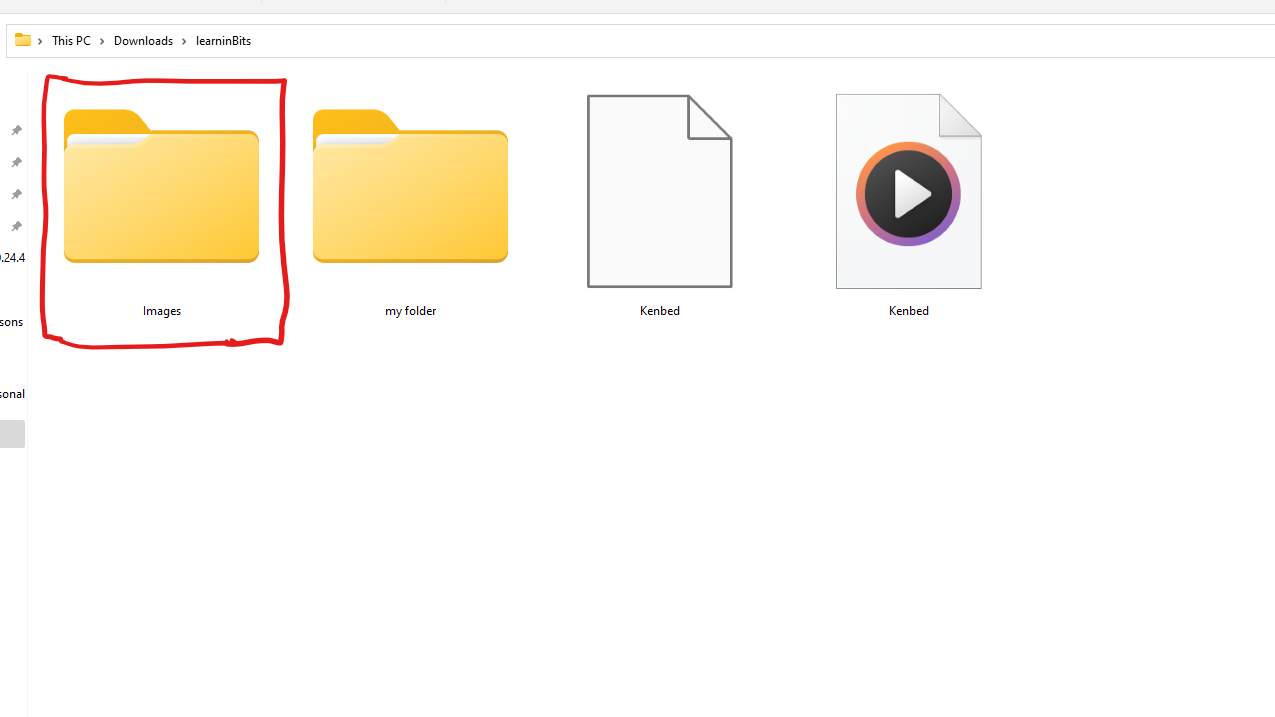
And when you take a look into the learninbits folder, you will see that the files have now been moved to a new folder called Images as shown below.
Conclusion:
You’ve just automated one of the most tedious tasks on your computer! This script is just the tip of the iceberg. Python offers endless possibilities for automation, making daily tasks a breeze. Even if you’re not a Python expert, understanding the basics, as shown in this tutorial, can lead to significant productivity gains.
Stay tuned for more tutorials to further simplify your digital life! If you found this guide helpful, don’t forget to share it with colleagues and friends and also check out our other Python guides and follow us on Twitter at @learninbits for the latest updates and tips!